Campervan Plumbing
Your campervan will be fitted with a number of plumbing related accessories to make your RVing experience convenient and comfortable. The luxury of your campervan is the ability to be able to choose how and when you use these accessories.
💡 You are travelling in a "self contained RV"! Many free or donation camps across Australia request that you are equipped with a toilet and grey water holding tank. You will have both on board, which means you can comfortably pull up to any free camp and know you are doing the right thing.
Water Pump
Your RV is equipped with a water pump, in most instances this will be found under the bed. However your only operation requirement is to turn on the pump via the switch located in the control panel. Clearly labelled, you will need to turn this on to get access to water.
The water pump runs off 12V, therefore it will only turn on if you have the control panel powered on (BMPro reference only, always on for all other 12V systems).
Best practices for using the water pump:
- Only turn the pump on when you want to use it. If you are not using it, save power and turn it off.
- Give it a few minutes to prime the pump prior to turning on the tap, shower or flushing the toilet.
The water pump should be a soft, barely heard, vibration sound. Common issues within RVs result in the lights flickering while the pump is in use or the vibration sounds increasing. If this occurs, refer to Apollo After Sales for third party warranty pump support.
Toilet
The toilet uses water from the fresh water tank and power from the 12V system to flush.
Ensure that the toilet and water pump is turned on at the main power board.
To use the toilet, pull open the lever (B), this will allow contents to go into the cassette box, use as needed. Once done, push the top button to flush (A), close the valve by pushing the lever back in, and re-flush. This will prevent odour from coming through.

Emptying the toilet
The toilet operates with a cassette, this means that all waste is collected in a cassette which will need to be emptied. To monitor cassette levels, most vehicles have gauge on the toilet system itself.
The Toilet cassette is accessible on the outside of the campervan (see external accessories).
- To empty the cassette pull it out by lifting the lever (F) under the black handle (G) and pulling it out. When removed, ensure it the top valve is closed and sealed (C).
- The cassette's black handle extends and it can be transported on its wheels. This is particularly useful as it can get quite heavy.
 |
 |
The above image is used as an example only and may not represent the specific brand or product installed in your RV. Please refer to your supplied product manual for further operation information.
- Once at a dump station, empty the cassette by sliding out its nozzle neck (D), unscrew the cap (E) and pour out contents into the dump station. Use a hose to flush out the cassette.

❗ Only ever dispose of black water waste into a registered dump station.
- Replace the cap and rotate the nozzle neck back into the cassette.
- Slide the cassette back into its compartment. Be sure to push it back in gently but firmly until it goes all the way back and locks itself in.
❗ Remember to empty the toilet cassette regularly as it can over flow.
Keeping the toilet clean
When using products to clean the toilet and cassette, you will want to put the pour the product down the toilet and flush it into the holding tank. This will allow it to clean the whole system.
❗ Never use bleach to clean your toilet as it will corrode and damage the rubber seals on the cassette box.
Seals can sometimes jam, you can prevent this by lightly spraying a lubricant oil onto the rubber. Olive oil works great for this.
To find toilet care products, head to www.apollorvparts.com.au
Toilet Vent
Above the toilet is a vent which works off of the 12V system.
This vent allows for the toilet room to air out.
Before operating the vent, open by rotating the switch next to it. Use the buttons/ touch system on the unit to operate. The toilet light switch will need to be on for the vent to work.
The middle button on the vent is to turn the on/ off. The side buttons to increase/ decrease speed.
To change the fan direction switch the vent off by pressing the middle button and once the fan has come to a stop, press the middle button again and it will begin to spin in the opposite direction.
*Instructions may differ depending on model, refer to your product manual for further information.
External Plumbing Features
Water tanks
Whether you have added additional quantities of tanks to your RV, it will come factory standard with three different types: fresh, grey and waste holding.
🛒 You will need to purchase a fresh water (blue) hose. These typically cost around $30-35.00.
All tanks are accessible on the drivers side of the vehicle.
Fresh water tank
The fresh water tank holds your pre-use shower, sink and toilet water. It is not recommended you drink the water from this tank. A water filter can be installed to your tap for drinking water.
Located under the campervan - fill access on the drivers side of campervan.
How to use: The fresh water tanks allow you to carry fresh water on your travels. Once empty, or approximately every two days with 'full time living' use, the fresh water tank will need to be refilled. To fill the fresh water tanks you will need to feed the blue fresh water hose into the water inlet socket, making sure the hose is inserted as far as possible. Connect the other end to the external water supply outlet. Turn on water and begin filling up your tanks. You will know it's full when water gushes out, this is the overflow warning you to stop filling. There is a separate air outlet on the fresh water tank. When you fill the tank with water it displaces the air to the top. When the tank is full, water will start dropping down underneath the centre of the van. This is normal and not an issue.
Hose: Light blue hose, with no nano-plastics.
Recommended length of 10m.
🛒 To be purchased separately
It is recommended to use a water filtration for all drinking water. These can also be purchased.
|
|

Fresh water tank refill inlet
|
Grey Water Tank
The grey water tank holds any excess water that is sent down your kitchen pipes and bathroom basin and shower drain.
Located under campervan - disposal access on drivers side of campervan through waste hose connection point.
The grey water tank should be emptied every two days or when full.
To empty the grey water tanks, use the supplied hose and connector located in your tunnel boot on delivery. Emptying of grey water is done into a grey water waste point, into a bucket or occasionally (depending on park rules) onto the ground. To empty, connect the hose to the grey water tank exhaust and place the other end into a waste point.
Open the valve next to the tap and this will allow the grey water to feed through from the tank into the dump point. The grey water tank has an overflow, when the red tap on the side is up, at a right angle, it shuts the valve off.
When the tap is in line it will be open and allow the water to flow out.
Hose: Black hose.
Comes with the campervan.
Waste (Black) Water Tank
The toilet cassette, otherwise known as the waster or black water tank holds the contents of your toilet.
Located down the drivers side of campervan.
Unlock using unique key and press both buttons in the open the toilet cassette door.
To empty the contents of the waste tank, lift up the clip under the tank and slide outwards. It will always be a tight fit.
❗ Disposal of waste water must be at a designated 'dump station'. These are easily identifiable with a blue sign and blue lid over a hole in the ground.
Hose: No hose needed. All waste goes directly into the toilet cassette.
Using Mains Water
If you don't plan on travelling much outside of holiday parks, or if you plan on being stationary for a long period of time, you may wish to avoid filling up your tanks. An alternate option is to connect to public supply main water. To do this you will need to:
- Find the brass male connecter located in your kitchen
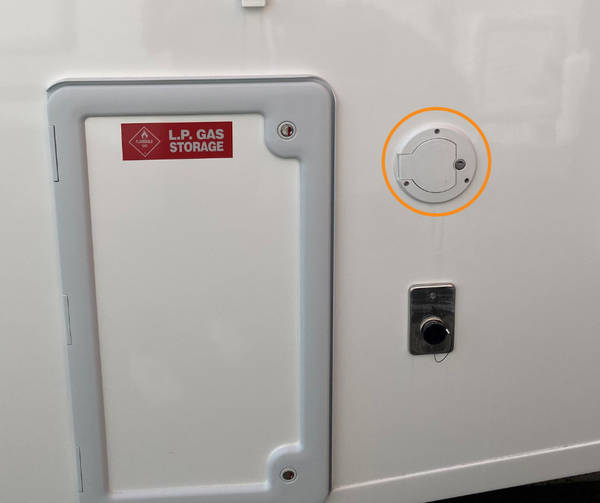
- Screw into the secondary inlet point located outside of your RV
- Clip the blue water hose in and turn on the tap
- Nothing will happen until you go to use the tap, shower or toilet inside

Monitoring Tank Levels
Tank levels can be monitored through the tank gauge monitor at the main power board or through the digital control panel. This will depend on the model of the campervan.
Tank Gauge Monitor

To work the tank gauge monitor you will need to press and hold the small button on right hand side of the display panel.
Fullness is shown through lights on the monitor. Please note that tank monitoring systems vary per campervan models. Open your control panel system and search for the panel that is clearly labelled 'tank' or with a tank icon.
BMPro Control Panel (applicable to select models only)
The Control Panel will report on water tank levels. The darkness in each water drop represents how full the tanks are. If you do not have a 3rd and 4th tank fitted to your RV, the bottom droplets will show as empty.
The example below shows Tank 1 as fresh water and Tank 2 as grey water tank. Note that the grey water tank will never be completely empty.

Internal Plumbing Features
Water Heater
When connected to a mains power source the water will automatically heat via 240V system.
The below water heater system (Truma UltraRapid switch) only comes into operation if your vehicle is using gas to heat the hot water.
The 240V will override this if plugged into mains.
The hot water system heats water for the taps at the sinks and shower.
Most models are fitted with a water heater option. Brands may vary per model and as such, specifications.
To know if your model comes with a water heater, you will find an on/off switch in the control panel. Only turn this on prior to you wanting to use hot water. Turn off after use.

Ensure gas is also turned on in order to use the hot water system.
Select 60 degrees on the Truma UltraRapid rocker switch located in the main electrical control panel.

Wait at least 30 minutes for the water to heat.
If a red light comes on that means the gas has failed to light the system and the process will need to be restarted again.

The water heater is located under the kitchen bench.
Truma-watersystems-ultrarapid- manual
Before first use:The Truma model will heat 14 litres of water in gas mode without a power supply or with the additional electric heating element.
In the Truma UltraRapid hot water system a powerful gas burner heats the water in your RV within a short time. The hot water system has excellent insulation to ensure that almost no heat is lost. If the water temperature drops, the electronics in UltraRapid reignite automatically. Set your desired water temperature conveniently on the control unit.
UltraRapid Gas runs independently of a power supply. UltraRapid Gas / Electric has an additional electric heating element. In mixed mode, the water heats faster.
When the water is hot, you can take a long shower with ample time to soap yourself. When the Truma UltraRapid Gas water heater is running, water is continuously reheated while you’re showering. This means that a second person can shower immediately afterwards.

Got a question on plumbing?
Or can't find what you are looking for? You can reach our team by submitting an After Sales support request, alternatively, connect with the Apollo Aftersales for Australia wide assistance on your RV.
👈 Main menu |
Next Module 👉 |

 Fresh water mains inlet